chibikart: rapid-prototyping a subminiature electric go-kart using digital fabrication and hobby components
by:Luteng CNC Parts2020-09-17
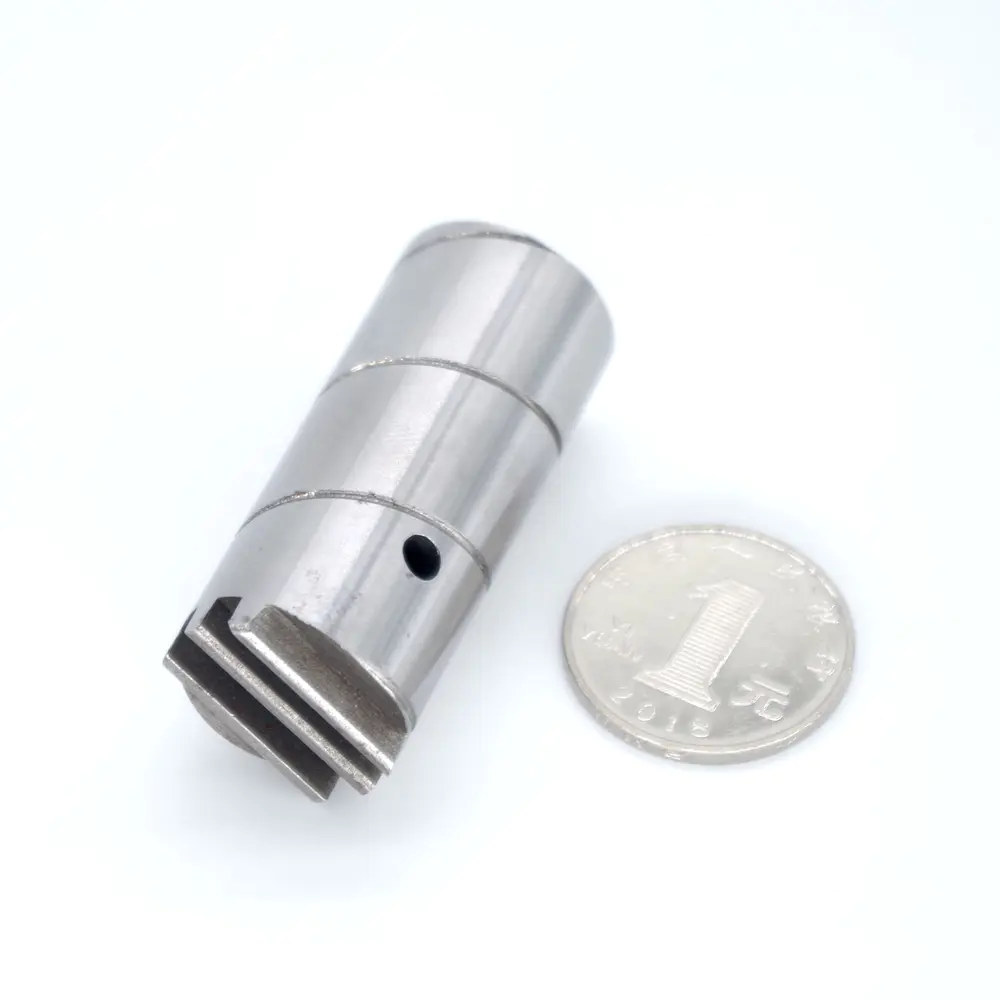
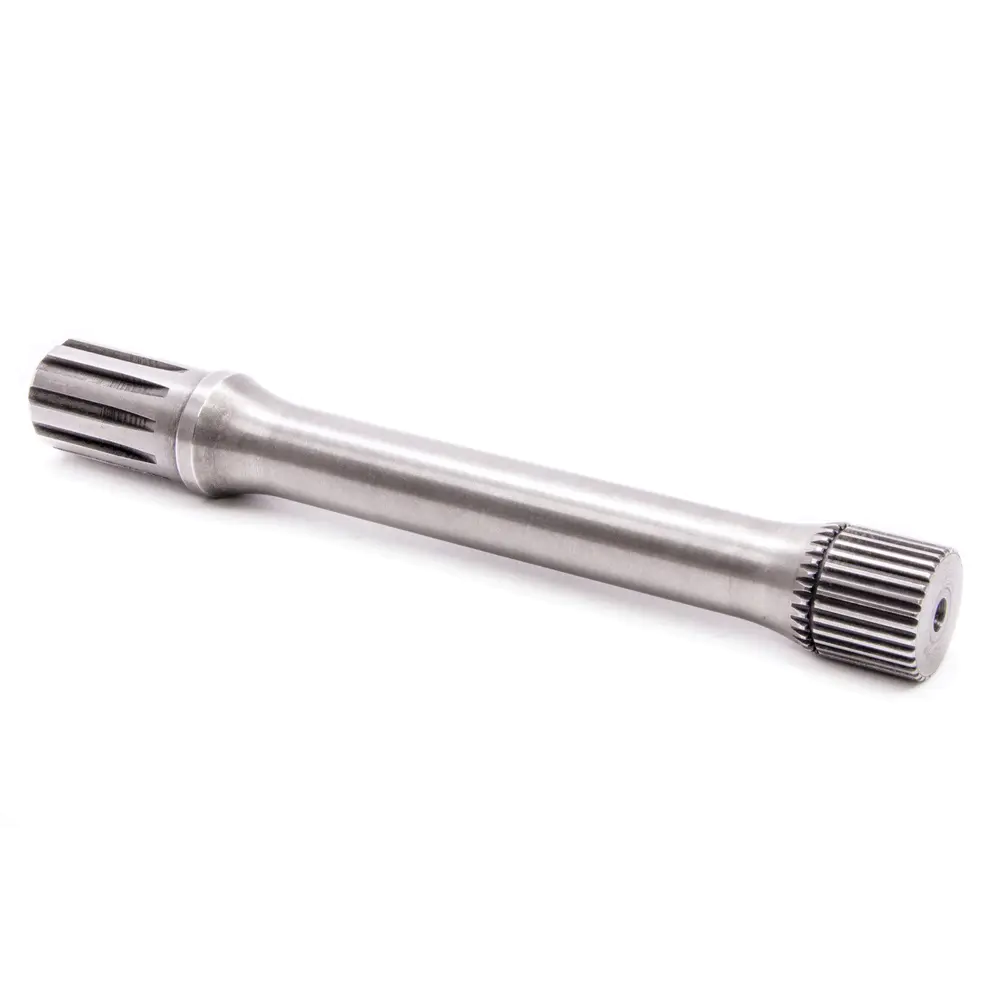
Chibikart! It is a very small but powerful and easy to operate 2WD electric go- You can use off-the- Shelf industry and hobby parts and frame parts made digitally. Use modern lithium-ion batteries and brushless permanent batteries Chibikart\'s magnet motor speeds up its small 34 \"x 26\" frame at a speed of 22 miles per hour. Designed to scale according to your own requirements, this design uses industrial slotted frame systems that are commonly used to build prototype machinery called 80/20. Precision- The cut aluminum frame parts are designed to be manufactured through an abrasive water jet processing service and can be assembled like a jigsaw puzzle. Many parts can be purchased from local hardware stores or home improvement shops. Some manufacturing needs to be done using normal garage and workshop tools (such as drill press, Hacksaw, bench plate and belt sanders), but no parts need regular machining such as milling or turning! The end product is intended to emphasize the complexity of modern manufacturers and builders who do not necessarily enter traditional machine stores or collectives such as hacking/makerspace. Especially for students and minors, it can be difficult and almost impossible to reach machine tools in our era of excessive safety and prudence. It aims to show that the world of hobbyists and hobbyists works far beyond Home Depot and hardware stores -- For many, this is often unknown, and they may be interested in pursuing engineering as a career, or want to explore it as a hobby. This version will focus widely on the catalogue of suppliers through the online industry (such as McMaster- Professional and amateur suppliers such as Carr, Surplus Center, HobbyKing, and digital manufacturing companies such as Big Blue Saw. Access to these electronic resources, which has only really become possible in the last few years, will help students and enthusiasts to produce higher quality, better projects. In my opinion, these resources alone are needed by most readers of this structure -- Often, many people who want to build things and generally know the methods they need are unable to move forward due to the lack of appropriate resources, whether tools or materials. In this case, this Instructable may be more useful as another resource and Technical Guide, similar to my previous article on the selection of electric vehicle power systems and the construction of hub motors. Chiikart is the latest in my long term vehicle creation built over the last few years, when I was an undergraduate in mechanical engineering at MIT ( BTW, I\'m still at MIT and now encourage undergraduates to build stupid cars in my master\'s thesis). When I first became interested in electric cars in 2007, I built the first comfortable electric scooter, an electric scooter called \"quirky\" but fully powered -- While I was going to use it as a campus cruise device, it would be better to be a trailer driver. By the way, snuggling let me write the first instructures guide on how to build a small electric car. The focus of my attention in these vehicles is the use of a custom designed micro hub motor, for which I have also written a guide to make more compact vehicles and make previously seemingly non-driving Or should not maneuver). Long story short, after testing the production water, I ended up getting a few motor parts over 100mm. Chiikart 1 chiikart 1 is built on a whim and has no special achievements. In fact, the real story of the first chiikart is to build a go- The first half of running kart\'s adaptation to tinyKart, similar to go A kart project led by a friend of mine ( And another member of the MIT stupid vehicle group), Shane Colton. Because I have promised not to build anotherhub- Before using up the production parts I purchased, the selection of the power system was obvious. I think Chibikart is popular both locally and on the international nets, and for some reason it is called the second arrival of MarioKart. In the store, when we are in a mental neighborhood or need entertainment, we occasionally take it with us to visit the convenient circular layout of the building. Just because I think building just for the sake of experience and adventure is a perfectly reasonable reason to start the project. People often think it is a waste of time to build personal projects for their own entertainment, which is a very disappointing attitude for me. Especially in engineering academia, there is a seemingly subconscious pressure that always proves why what you are building is useful, optimized, commercialized, groundbreaking, and so on. I think no matter what the project is, you will inevitably gain experience or new knowledge in each build, which will help to do better work in the future -- For yourself or others When problems inevitably arise, immersion in project work encourages thinking about creative solutions Test your critical thinking and analytical skills. By choosing your own project, you can also invest on your own -- No one will let you down, and no one will set you up with a barrier that you can barely figure out, unlike a direct \"class item\" or something like that. You are only involved for personal benefit, which is a huge motivation for many people. For this reason, this new chiikart doesn\'t actually bring anything new. All the methods, parts, suppliers, and other resources described here are commonly used by mechanical project builders everywhere. However, I will present them in a format that introduces them as needed and in, not linkdumping. . . mostly. . . logical order. One of the trends in internet reviews about chiikart 1 is that for others who do not have extensive mechanical equipment, it is almost impossible to build chiikart 1. Yes, in this case, I actually have a hard time measuring what the internet is saying because it is a deep study of the attitudes of \"technicians\" and \"gadgets\" people -- Many of the sites produced by chiikart have reasonable technicians, but the direction is clearly not centered on \"manufacturers. These people may have some knowledge of the latest processors and chipsets Apple uses in the iPad, or have some knowledge of the engineering process involved in it. Some websites sometimes even post rather heavy engineering and scientific content, such as the latest 3D printers or the death of droves of quadcopters --cloud. But what they didn\'t do was pick up the tools and do something. They\'re not stupid- It\'s just that they haven\'t been exposed to the tenacious ground floor of engineering, machines, and people who end up making iPads. But the statement about chiikart 1? Totally true. Those hub motors are well customized Having gone through 4 to 5 different versions of machined assemblies, even if I hand over all the parts and drawings to someone, they have to get in touch with the machine and learn how to use it, then like I was just trying to get a working motor, I stumbled across many of the same traps. Or they can hire a mechanic or shop for $3500 to make them, it\'s just mechanical parts. A123 systems will never sell you one of the custom 33 v lithium ion batteries I use. The rise of digital manufacturing, but said I took the hub motor and the sweet custom battery, model the airplane motor and commercial Li-with my hobby-ion packs. All of a sudden, Chibikart becomes very accessible because it actually rarely uses traditional machined parts. \"Digital manufacturing\" is one of the new words from the intersection of strange design spaces between engineers and futurists. In addition to the similar term \"personal manufacturing\", it also symbolizes the ability of designers- Requirements and bypassing of traditional tool manufacturing, assembly line, design cycle and other systems. Reaching a job may not be production Prepare the product in a short time. Personal manufacturing is a more specific form of defining \"designer\" as anyone who wants to customize a product or something. Basically, anyone can get instant design satisfaction. Parts are useful or close immediately-net- The machine can be reconfigured to make many different parts in a short time. The most common process under this tag is a computerized 2D process. Laser cutting and water spraying- 3D processes such as 3D printing and scanning that require minimal operator intervention. Traditional multi-axis CNC machining is often not considered, as it is still necessary to set up CNC work quickly and effectively with a trained mechanic with many years of experience. But the 2D process is always good. Optimization works for anyone The laser cutting machine is usually plug-and-play and can accept many 2D graphic formats. The water jet is basically the same, and 3D printing is like 2D printing ( If you don\'t insist on building your own. Over the past few years, high-priced services such as laser cutting, water spraying and 3D printing have been brought to the market. Now, there are services that can send the 3D model to and it will return as a finished product in a week or two. Examples of these services include shapeway and I. 3d printing (i. I am a more upscale version) And a large blue saw for water spraying and laser cutting. All of these places will give you instant quotes based on the model you uploaded. Are we the future or what? You can actually do a lot of things with 2D parts. They can be arranged in a creative way, usually including some kind of wooden dinosaur model Angle connection to create a functional mechanical structure. They may not have the fit and polish of the new car, but that\'s not what we\'re after here. Five years ago, in 2007, the cost of electric vehicles fell and it was still quite difficult to build their own custom electric vehicles. Small (\"personal\") Vehicles in particular; Before you think electric forklifts, golf kart and other big bikes have been around for years, it seems strange that if you assemble an electric car or bike, that\'s where you scrap the parts! In the last few years, dedicated small- Electric vehicle parts company and business Expensive motors, controllers, and batteries make it easier than ever to make their own small assemblers. Part of the reason is the rapid rise in power and energy density of electric model aircraft components, while the price has dropped by nearly an order of magnitude The details of this are covered in my \"scooter power system\" instructions. Considering the availability of 2D accuracy, bottom line- Cutting metal parts and cheap recyclable parts that can be used for vehicles, I think it\'s time to produce a design that is basically easier to get, but in roughly the same shape, such as the report of chiikart\'s final accounts. The construction itself is not too spectacular, but the concepts and resources presented during the construction process will be beneficial to those who are trying to build their own vehicles or mechanical projects, however, they may not be confident in their knowledge or just need extra places to get the parts. The car will not have \"driverless\", nor will it have what I call the unmanned aerial vehicle used in the building under construction, and all parts must be available from a commercial supplier with an online ordering portal, or very common IRL (e. g. Hardware store or hobby store). Build one, challenge me. Step 11. 1: Place one 4- Screw the 40x1/2 screws into the hub and adding this means you can drill the rest out and know they all fit- This is why we are going through this seemingly roundabout process. Bolt the hub plate to the wheel with 1 4-40x1/2 \"screw. Step 11. 2: verify the level of the hub plate, don\'t screw this screw too tightly! In fact, it is best to make it slightly loose: the hub board needs to be able to sit flat on the hub. Step 11. 3: drill the rest of the hub hole-to-be- Now tap with the 42 drill bit, take this back, arm it with the 42 drill, and drill the remaining 7 holes into the Colson wheel. Step 11. 4: tap the starter thread in the rest of the holes, maybe I should get people to start tapping the plastic. . . Step 11. 5: drill the inner sleeve hole on the Hub plate with 32 drills now we drill the gap to drill the hub hole to pass through 4-40 screws. Continue to drill out the inner ring using 32 drills. Step 11. 6: Clean the other side when you go to drill, you may notice that the burrs below make your work difficult. When these files are formed with hand files, delete them. Step 11. 7: connect the hub plate to the wheel and verify that it rotates freely. This is a key step, though it seems to be a waste of time. Use ALL 8 4- 40X1/2 \"screw and attach the hub plate firmly to the wheel. Tighten fully - 1/4 to 3/8 turn to flush water. This is to double check that all your holes and holes are not biased to one side. If there is interference or tightness, you need to remove the hub plate and clean up its center hole a little more. If you apply the marker pen to the inside of the hub plate hole, see where it rubbed, and then file it wisely in that place, you may see where things rub. There shouldn\'t be much interference, but it may take a while to put these screws in. . . . Step 11. 8: tap the outer ring of 4 holes- Please continue to thread all 8 External holes while you are still connecting the board. These will be fitted with a sprocket hub plate. Step 11. 9: remove the hub plate from the wheel and connect the sprocket. Yes, you have to remove the hub screw again! We will Chamfer ( Processed into inclined surface) On the chain teeth of the next step. To do this, they need to be attached to the hub board so that they can be caught by a 1/2 core. Step 12. 1: install the sprocket on a bolt core of 1/2. This is where the rough material starts. We will install the sprocket on a temporary shaft that we can rotate, and then apply a metal file to chamfer the tooth tip. The term for this temporary shaft is the shaft or rod. Do not confuse with monkey species. Get 1/2 \"diameter x2\" long bolts (1/2\"- 13 is the most common) One nut and at least one gasket. If you have two washers, the sprocket should be placed between the two washers. Otherwise, use the washer on the nut side- This is to prevent aluminum from deterioration by harder steel nuts. Tighten the sprocket between the NUT and the bolt head. Place the sprocket at the visual center of the shaft. Because the files are hand held, it is not necessary to be absolutely determined. Step 12. 2: install the core stick on the drill bit with a 1/2 Chuck. Any bit can work, but you may want someone to help you hold the bit or file. Step 12. 3: keep the file on the chain tooth when the sprocket is spunFile about 30 degrees (From Level) Chamfer at the edge of each sprocket. You want to reduce the thickness of the tip of your teeth by about half. Take them to 1/16 to 3/32 thick. The chamfer of the chain tooth can ensure that it does not wrap around the square edge of the chain on the chain and derail the chain. Be careful in this process Use the middle of the file, not the prompt. The tip may be stuck on the chain tooth, which is not only bad for the sprocket, but may start the file through you. Because really, you\'re not very hard compared to aluminum. Step 12. 4: verify that the Chamfer is roughly equal in height, don\'t worry if you chamfer a little more on one side than on the other -- This is not the key. If you really have obsessive-compulsive disorder, then you can flip the sprocket over the core shaft so you can see what you are chamfer at any time! Step 12. 5: reconnect the chamfer sprocket assembly to the wheel and install those 1/2 screws again! That\'s it. Put all the screws in and tighten them all. Step 12. Yes, now you can do the second wheel and repeat the steps 10 to 12. Do you have enough nerves? If you do read in advance, you will know that one way to save time is to perform all the steps in parallel Work on the sprocket and hub at the same time. Congratulate you once you have completed two drive wheels! The car has not been built. Everything else is assembled from here. It might be a good idea to clean up the store and reset your tools at this time. That\'s it. Everything in the electrical system is connected and we are ready to open it. However, before you drop it on the ground and fly, we have to do a sound check of \"wheel up\" to make sure the wheel rotates correctly. . . Step 43. 1: put the rear wheels on the block Because this thing is too low so almost anything can work And support the rear wheels from the ground. Step 43. 2: insert battery and vehicle PWR connector. You have now connected the battery to the system. Because it\'s not alive yet. . . Step 43. 3: Flip the Hella switch forward, did the Fuse? If not, congratulate you! The system is now powered on. If so, then the most likely explanation is that you connect east to west. Go back and check each wire to make sure the red goes to the front and the Black goes to the negative! The MOSFET switches in these controllers are free to move backwards, so this is a dead angle if the polarity is incorrect. Step 43. 4: tap the throttle gently, observe the behavior of the motor, and watch the demo video here. The sensor-free start-up program of the controller causes the motor to tremble suddenly and then begins to rotate in one direction. If nothing happens, verify that the throttle connection is correct: 5 v to red, SIG to White, RET/GND to black, and the other side is correct. If this is correct, then use the voltmeter to double check if the throttle signals between about 0. 8 and 4. 1 volts. It may be a bit out of this range, but it should change smoothly as you step down the depth of the pedal. Also check that the 5 v terminal is actually 5 v and not less than about. 4. 85 volts. Any reduction may indicate a throttle failure (shorted) Or some other unusual load. Is the motor rotating in the correct direction? If you have a motor (or both. . . ) Rotate back, don\'t worry! Select any two of the motor wires and swap them. Yup. That\'s it. The sensor-free drive is so good. If your system goes through the wheel After the test, it\'s time to reinstall the seat! Turn off the power switch. Take the vehicle up and down the block and reinstall the seat similar to the procedure in step 34. If there is no response and all the wiring is correct, then the problem is beyond the scope of this description. Sorry :( Charging your chiikart is simple. Single-use chargersI specifies a 24 v battery charger in the BOM, and now you may already have it. These 24 v Chargers are typically equipped with crocodile clips or \"XLR\" connectors and are typically used for microphones and audio devices. Strange. I have nothing to recommend other than cutting off existing connectors and adding my own. Figure 45. 2 and 45. 3 Related to \"single use\" charger- If the wires are not indicated outward, you may need to check their polarity. This is a handy appliance. They can charge each type of battery ( Lithium, nickel and lead of various flavors) , For basic batteries that can handle up to 6 lithium batteries, start at $25 and start at about $40 for batteries that can handle more than 8 Batteries. I have used 1010B for a few years and I like it very much. Accucel 8 is a good 8-cell charger that can handle 24 v packs of chiikart. These 12 v bricks are pretty good in themselves. But their charge levels may begin to drift over time. Even if Hey, I swear I \'ve just charged this, you usually go through this sudden power outage. The battery has an internal safety cut-off plate, which makes it \"weak\" if the voltage on the battery pack is less than about 10 volts \". To wake them up and refresh their HP, you have to use the 12 v charger and charge each battery separately. This is the time to make multi charger very convenient. The internal safety cut-off voltage for Jasontrollers is 21 volts, so they assume to prevent the battery from \"fainting \". In any case, the performance of the vehicle may become unacceptable dull before this point. Mechanical maintenance there are not many mechanical faults on chiikart except the brakes and drive chains. Of course, the chain should be regularly lubricated with bicycle chain oil or similar oil. If it becomes too soft, loosen the motor screw and slide the motor up to re-stretch. The brake pads will eventually need to be replaced, but the bike brakes will also need to be replaced, so run back to the bike shop. Do not operate chiikart in the rain or in any damp place The controller and battery are well sealed and none of the rest of the electrical system is available. Danger is not such a big shock danger (it\'s only 24v) Accelerated electrical corrosion of metal conductors. When Chibikart is perfect for the Interior, be aware that it is made of metal with sharp edges. It is a great height to cut someone\'s ankle directly. Be careful when operating it around anyone. It hits the wall and the floor and the owner of your impromptu venue may not be happy with it. I hope everyone will find this guidance to be of great help in starting construction machinery projects or moving forward with existing ones! This is a book worthy of the name ( Write a short book seriously). How to write a comprehensive To is never my style because I usually encourage exploratory learning and find it myself. However, this version of chiikart is an opportunity for me to combine this style of \"guide\" writing with Instant Apps. I hope everything goes well. To encourage the filling of the gaps, many parts are deliberately blurred and sometimes partially magically implemented. My design error is included in the open as part of the instructions ( Of course, there are suggestions to avoid them) To show that even if you think you know what you\'re doing with this super simple thing, there\'s always something you \'ve never thought about before. This is the case for any engineering project, no matter the size, this is something that the builders need to remember in particular at the beginning -- Frustration is something that happens often and unless you already know everything about it, it may not work properly the first time you do it. I do not intend to further reduce the price of the building, nor do I intend to make major changes to this design. Again, I hope not to see thousands of chiikart clones flying around in Maker Faires, although this is hilarious, but for the reader (you) Use the concept presented in this structure to build your own quirky, possibly small-form-factor vehicle. The resources for parts and manufacturing methods will be most beneficial for those who can apply them themselves. The link dump and the resource ESI always include this at the end of my instructures, which is no different! This is a general list of resources. Not all of this is for auto parts, and some are for robots. First of all, this is chiikart 1 and the Democratic People\'s Republic of chiikart ( (This is chiikart) Static page on my website. A thoughtful PartsHobbyKing dealer The import amount is amazing- Motor, battery, charger, controller for Type R/C number, etc. McMaster- The best online source for industrial, mechanical and hardware components in Carr. Digi- Keys like McMaster. . But only for electronic components! Custom parts for the Blue saw you designed. Upload the DXF file and get an instant quote. Custom 3d printed parts for 2D water spray and laser parts for BBS. The average turnaround time is 10 days. it\'s really cheap! Dedicated controller and hardware for electric vehicles. Want the upgrade path for chiikart? View the KBS line. Imported small electric car accessories dealer- Almost every wheel, brake, motor, throttle, etc. You can think of it. The market space of the TNC scooter is similar to that of the MSP, but there are also rare pedal throttle. HobbyPartz is a hobby dealer similar to Hobbyking, but has more options in the USS. . . . Because they are in America. S. ! Supplier of most robot parts- Motor, controller, material, transmission parts. . . Custom Pololu suppliers Robot components and useful small motor, controller gearbox and robot kit are designed. My favorite internet metal dealer when eBay can\'t save my day. Another online metal. . . metals. . . . Place, one of the original many years ago. All electronics are one of the best electronics remaining venues for robot manufacturers. Gold mine electronics another good electronic products remaining website adafruit Industries custom open source DIY- Fashion electronics projects and kits. Sparkfun Electronics is basically the same market as Adafruit, but the distribution network and product selection are much larger. People put their projects online by building logs, logs, and blog posts. I don\'t include the shiny \"finished product\" portfolio site here. It\'s just a dirty, unpolished side and a story about it. I think this part is actually more valuable than resources because they show how different people use the same parts and technologies creatively to achieve different purposes. Current and alumni of MITme! ) Customized electric vehicles, quasi-combat robots 3d printer. . . Shane Colton custom electric car motor controller design, flying thingsAmy Qian very clean custom wheel motor \"front wheel big rear wheel small bicycle, small go Karting, a few more. Wooden vehicles! Jordan King Stone Balance skateboard and quad rotor, fashion adviceDaniel Fourie MITJed Storey 4-several machine design projectshub- Electric Motor long board! Eli Davis Builder of Eli Davis, by the way, is shown in its own Instructure! Daniel Kramnik section of MITERS high pressure Squadron; Tesla coils, induction heaters and other HVTyler Christensen fusion reactors, tesla coils and high-performance audio; One of the students in my building --your-own-electric- \"2. David Wise is another student in grade 2. 00EV, he is in charge of Mellon Carter with Jackie. Bayley Wang is a member of the miters hv squad and a 2-year-old student. 00EV; High power electronics, Tesla coils and overclocking. Another student blog by Daniel Gonzalez Excellent custom seaplane Frame scooter with sensor control victor Rodriguez is a student electric scooter with sensor control and slightly different frame methods. And LED cubes. Other builders joined part of the Georgia Institute of Technology, the university\'s stupid automobile alliance. Custom electric vehicles with hubs and non-hubs Hub Motor, battle robot. Aaron Fan is also part of the csvl gt chapter. Segboards are all available. Robots with strange coordinate systems Xo Wang is another member of the csvl gt chapter. Quad-hub- The BU chapter of Adrian Tenna CSVL, a car long board with custom everything. Small motorcycles and custom cars! Electric motorcycles in real lifecombat robots. There\'s a little bit of everything. Custom polar- 3D printer coordinatesSpace balloon. Dale hasselington was one of my early mentors, co-founder of Hayes day Hayes Microcomputer Products. Many customized and innovative robots. Ball- Balance Segwaylike vehicle. All in all, these sites are cool and I find that for whatever reason, whether it\'s a treasure house of information or a knowledgeable person, or whatever, I \'ve come back to a lot of sites. Many great guides about parts and rulesof- Lessons learned from common engineering problems machine tools archive a great history lesson for many classic mechanical manufacturers! RoyMech In- Many engineering topics such as mechanical parts, power transmission and connecting rod are deeply scientifically processed. . . My favorite walkthrough and click on the autodesk inventor design file si for chartchiikart to design the entire vehicle in Autodesk Inventor 2012 software, by the way, Autodesk will be available for free Like beer, not dom) If you were a student Just one. Email or something else that proves that you are doing what you are learning. The DXF cut file for chiikart was edited in AutoCAD Mechanical 2011. Here is the original Inventor file for chiikart ( They are hosted on my website).